以前當我第一次接觸 AWS Lambda Function 時,是在上 AWS Training 課程,使用 AWS Console 建立了一隻 Hello World。而 SAM (Serverless Application Model) 是一個開源的程式,主要在 CloudFormation 的基礎上擴展,專門用來開發 Serverless Application。我們可以透過 YAML 去定義我們的系統架構 像是 Endpoint 由哪個handler 處理,額外的 database (DynamoDB) 等等。這次的文章,主要是介紹使用 SAM 建立一個 Java Hello World 的 Lambda Function。
事前準備
- 一個 AWS 帳號
- 安裝 AWS CLI 並 設定好,SAM 的權限是根據 AWS CLI喔!所以 SAM 不用額外設定 Access Key ID & Secret Access Key
 1# 安裝 AWS CLI
 2$ pip install awscli
 3
 4# 確認 AWS CLI 安裝成功
 5$ aws --version
 6 aws-cli/1.19.105 Python/2.7.16 Darwin/20.4.0 botocore/1.20.105
 7
 8 # AWS CLI 設定
 9 $ aws configure
10 AWS Access Key ID [****************ASFC]:
11 AWS Secret Access Key [****************fM7z]:
12 Default region name [ap-northeast-1]:
13 Default output format [json]:
- Java11 JDK & Maven,這邊可以透過 Brew 安裝,如何安裝 Brew 看官網教學
 1# 安裝 open jdk11
 2$ brew install openjdk@11
 3# 確認 Java JDK 安裝成功
 4$ java -version
 5 openjdk version "11.0.10" 2021-01-19
 6 OpenJDK Runtime Environment (build 11.0.10+9)
 7 OpenJDK 64-Bit Server VM (build 11.0.10+9, mixed mode)
 8
 9# 安裝 maven
10$ brew install maven
11# 確認 Maven 安裝成功
12$ mvn -version
13 Apache Maven 3.8.1 (05c21c65bdfed0f71a2f2ada8b84da59348c4c5d)
14 Maven home: /usr/local/Cellar/maven/3.8.1/libexec
15 Java version: 11.0.10, vendor: Oracle Corporation, runtime:   /usr/local/Cellar/openjdk@11/11.0.10/libexec/openjdk.jdk/Contents/Home
16 Default locale: zh_TW_#Hant, platform encoding: UTF-8
17 OS name: "mac os x", version: "11.3.1", arch: "x86_64", family: "mac"
- Docker ,由於 Docker 安裝比較麻煩,這邊就不寫安裝方式,我個人 MAC 是安裝 Docker Desktop
1$ docker --version
2 Docker version 20.10.7, build f0df350
- 今日主角,SAM CLI,這邊也是透過 Brew 去安裝
1# 安裝 SAM CLI
2$ brew tap aws/tap
3$ brew install aws-sam-cli
4# 確認 SAM CLI 安裝成功
5$ sam --version
6 SAM CLI, version 1.25.0
SAM 初始化專案
1$ sam init -r java11 -d maven --app-template hello-world -n demo
2
3# -r :  --runtime 的縮寫,執行環境的語言,這邊指定 java11
4# -d : --dependency-manager 的縮寫(軟體套件管理系統),這邊指定 maven
5# --app-template : 官方已經有寫好一些 template 提供大家使用
6# -n : --name 的縮寫,這個專案的名稱
7
8# 如果想瞭解更多參數,和每個參數可以設定的選項,可以使用
9$ sam init help
透過 SAM 初始化,會建立以下的檔案
 1$ tree
 2 .
 3 ├── HelloWorldFunction
 4 │   ├── pom.xml
 5 │   └── src
 6 │       ├── main
 7 │       │   └── java
 8 │       │       └── helloworld
 9 │       │           └── App.java
10 │       └── test
11 │           └── java
12 │               └── helloworld
13 │                   └── AppTest.java
14 ├── README.md
15 ├── events
16 │   └── event.json
17 └── template.yaml
Template.yaml 是我們設定 Resource 相關的資訊,由於太多這篇就不一一介紹,這邊會在產生出來的 Code 加一些簡單註解
 1AWSTemplateFormatVersion: '2010-09-09'
 2Transform: AWS::Serverless-2016-10-31
 3Description: >
 4  demo
 5
 6  Sample SAM Template for demo
 7
 8Globals:
 9  Function:
10    Timeout: 20
11
12Resources:
13  HelloWorldFunction:
14    Type: AWS::Serverless::Function # 這邊是指 Lambda Function
15    Properties:
16      CodeUri: HelloWorldFunction
17      Handler: helloworld.App::handleRequest # 這邊指定 Handler
18      #helloworld : java package
19      #App : class name
20      #handleRequest : handle request method
21      Runtime: java11
22      MemorySize: 512
23      Environment: # 可以設定系統環境的地方
24        Variables:
25          PARAM1: VALUE
26      Events: # Trigger 這個 Lambda Function 的 Event
27        HelloWorld:
28          Type: Api # Event 是由 API Gateway 來的
29          Properties:
30            Path: /hello # Api Gateway Endpoint
31            Method: get  # Http Method
32
33#Outputs 就請參考 CloudFormation
34Outputs:
35  HelloWorldApi:
36    Description: "API Gateway endpoint URL for Prod stage for Hello World function"
37    Value: !Sub "https://${ServerlessRestApi}.execute-api.${AWS::Region}.amazonaws.com/Prod/hello/"
38  HelloWorldFunction:
39    Description: "Hello World Lambda Function ARN"
40    Value: !GetAtt HelloWorldFunction.Arn
41  HelloWorldFunctionIamRole:
42    Description: "Implicit IAM Role created for Hello World function"
43    Value: !GetAtt HelloWorldFunctionRole.Arn
這邊順便介紹主要處理邏輯的 Handler
 1package helloworld;
 2
 3import java.io.BufferedReader;
 4import java.io.IOException;
 5import java.io.InputStreamReader;
 6import java.net.URL;
 7import java.util.HashMap;
 8import java.util.Map;
 9import java.util.stream.Collectors;
10
11import com.amazonaws.services.lambda.runtime.Context;
12import com.amazonaws.services.lambda.runtime.RequestHandler;
13import com.amazonaws.services.lambda.runtime.events.APIGatewayProxyRequestEvent;
14import com.amazonaws.services.lambda.runtime.events.APIGatewayProxyResponseEvent;
15
16/**
17 * Handler for requests to Lambda function.
18 */
19public class App implements RequestHandler<APIGatewayProxyRequestEvent, APIGatewayProxyResponseEvent> {
20
21    public APIGatewayProxyResponseEvent handleRequest(final APIGatewayProxyRequestEvent input, final Context context) {
22        // response 的 header
23        Map<String, String> headers = new HashMap<>();
24        headers.put("Content-Type", "application/json");
25        headers.put("X-Custom-Header", "application/json");
26
27        APIGatewayProxyResponseEvent response = new APIGatewayProxyResponseEvent()
28                .withHeaders(headers);
29        try {
30            // call amanzon api 取得系統 IP
31            final String pageContents = this.getPageContents("https://checkip.amazonaws.com");
32
33            // response body
34            String output = String.format("{ \"message\": \"hello world\", \"location\": \"%s\" }", pageContents);
35
36            return response
37                    .withStatusCode(200)
38                    .withBody(output);
39        } catch (IOException e) {
40            return response
41                    .withBody("{}")
42                    .withStatusCode(500);
43        }
44    }
45
46    private String getPageContents(String address) throws IOException{
47        URL url = new URL(address);
48        try(BufferedReader br = new BufferedReader(new InputStreamReader(url.openStream()))) {
49            return br.lines().collect(Collectors.joining(System.lineSeparator()));
50        }
51    }
52}
所以從以上來看,這邊就是透過 Template.yaml 去指定 環境執行語言, API Endpoint 和 Handler 等等重要資訊。而 App.java 就是我們 Lambda Function 主要計算邏輯。目前透過這兩個 File 就可以產生出基本的 get hello 函示。
這邊要注意,hello-world Template 建立出的 pom 檔,裡面指定的 Compile Source 是 1.8 ,這邊建議改成 Java 11
1<properties>
2    <maven.compiler.source>11</maven.compiler.source>
3    <maven.compiler.target>11</maven.compiler.target>
4</properties>
SAM 本地測試
SAM 我個人覺得最方便的就是,它使用了 Docker 的技術,讓我們可以在本地也可以建立起一個環境做測試 API
1$ sam local start-api
2
3 Mounting HelloWorldFunction at http://127.0.0.1:3000/hello [GET]
4 You can now browse to the above endpoints to invoke your functions. You do not need to restart/reload SAM CLI while working on your functions, changes will be reflected instantly/automatically. You only need to restart SAM CLI if you update your AWS SAM template
5 2021-07-03 19:40:16  * Running on http://127.0.0.1:3000/ (Press CTRL+C to quit)
從上面的 Output 可以看到,起了一個環境,並聽本地的3000 port,這邊會在開另一個terminal 來測試 curl 來測試結果
 1$ curl -v  http://127.0.0.1:3000/hello
 2 * Trying 127.0.0.1...
 3 * TCP_NODELAY set
 4 * Connected to 127.0.0.1 (127.0.0.1) port 3000 (#0)
 5 > GET /hello HTTP/1.1
 6 > Host: 127.0.0.1:3000
 7 > User-Agent: curl/7.64.1
 8 > Accept: */*
 9 >
10 * HTTP 1.0, assume close after body
11 < HTTP/1.0 200 OK
12 < X-Custom-Header: application/json
13 < Content-Type: application/json
14 < Content-Length: 57
15 < Server: Werkzeug/1.0.1 Python/3.8.11
16 < Date: Sat, 03 Jul 2021 11:47:10 GMT
17 <
18 * Closing connection 0
19 { "message": "hello world", "location": "114.44.114.30" }
在原本的 Terminal 可以看到以下資訊
1Mounting /Users/allen/demo/.aws-sam/build/HelloWorldFunction as /var/task:ro,delegated inside runtime container
2 END RequestId: 74bd804b-096b-473b-9c3f-2ba1cd847431
3 REPORT RequestId: 74bd804b-096b-473b-9c3f-2ba1cd847431 Init Duration: 0.37 ms Duration: 2255.80 ms Billed Duration: 2300 ms Memory Size: 512 MB Max Memory Used: 512 MB
4 2021-07-03 19:44:13 127.0.0.1 - - [03/Jul/2021 19:44:13] "GET /hello HTTP/1.1" 200 -
Sam 也可以直接一次性的執行某個 Function
1$ sam local invoke "HelloWorldFunction"
2 Invoking helloworld.App::handleRequest (java11)
3 Skip pulling image and use local one: amazon/aws-sam-cli-emulation-image-java11:rapid-1.25.0.
4
5
6 Mounting /Users/allen/demo/.aws-sam/build/HelloWorldFunction as /var/task:ro,delegated inside runtime container
7 END RequestId: 70223332-2a37-4094-bdf2-aa924df0d416
8 REPORT RequestId: 70223332-2a37-4094-bdf2-aa924df0d416 Init Duration: 0.29 ms Duration: 2153.55 ms Billed Duration: 2200 ms Memory Size: 512 MB Max Memory Used: 512 MB
9 {"statusCode":200,"headers":{"X-Custom-Header":"application/json","Content-Type":"application/json"},"body":"{ \"message\": \"hello world\", \"location\": \"114.44.114.30\" }"}
SAM 部署到 AWS
這邊可以透過 sam deploy –guided Deploy 到 AWS 上面,由於內容資訊比較多,所以這邊用圖片的方式,在第一次執行時這邊會需要填寫一些預設資料。
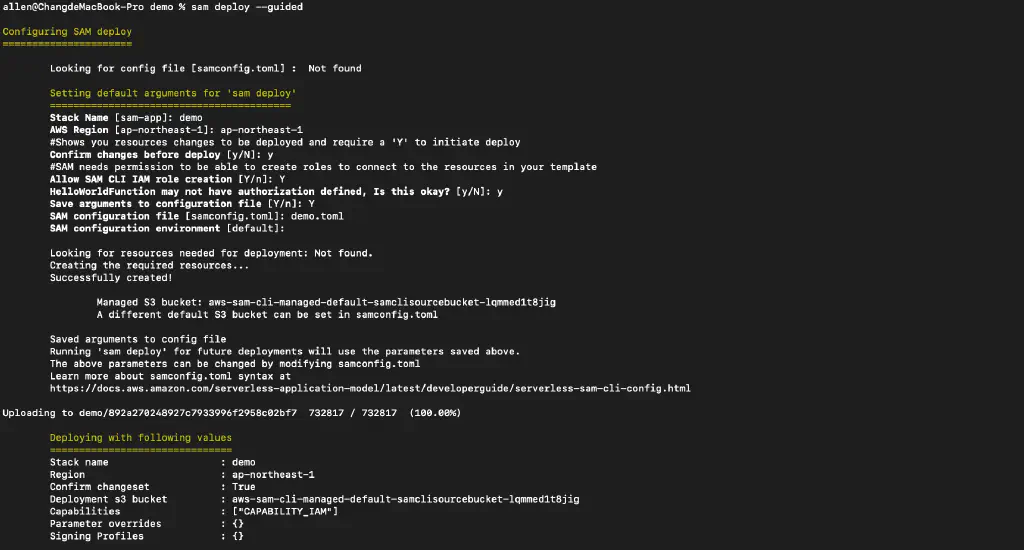
在填完預設資料後,SAM會一直執行,直到要你確認這次 Deploy 的改動 CloudFormation 的 changeset
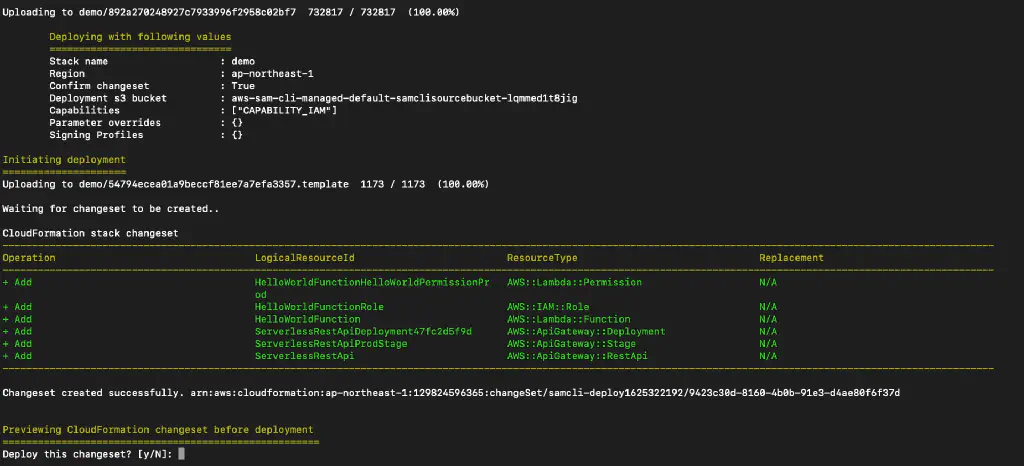
CloudFormation 這時候會卡在 REVIEW_IN_PROGRESS

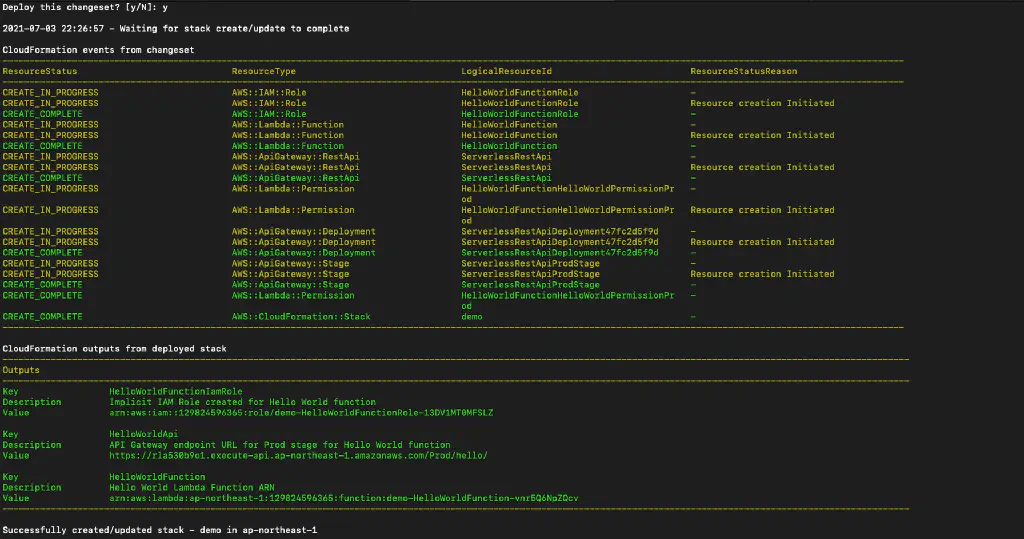
這時Change Set 同意以後,這時看 CloudFormation 會正在建立 Resource, Status 是 CREATE_IN_PROGRESS

SAM CLI 在 Deploy 完以後,會看到類似以下資訊
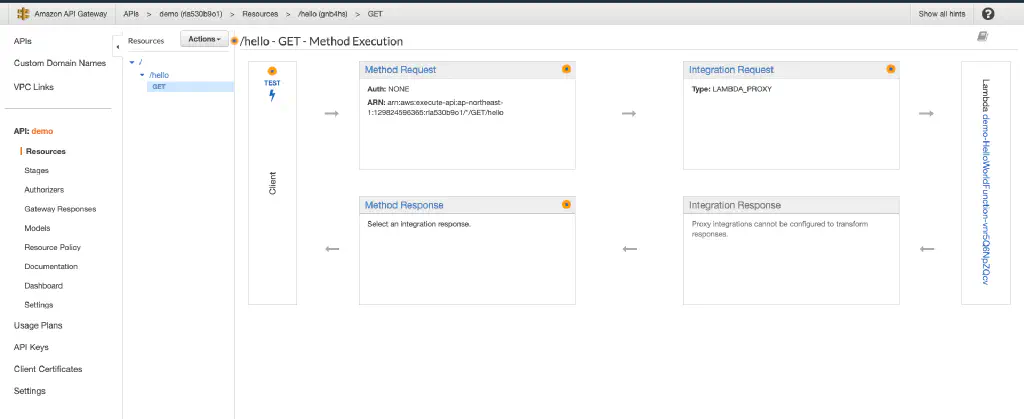
可以在 API Gateway 看到新的 Endpoint
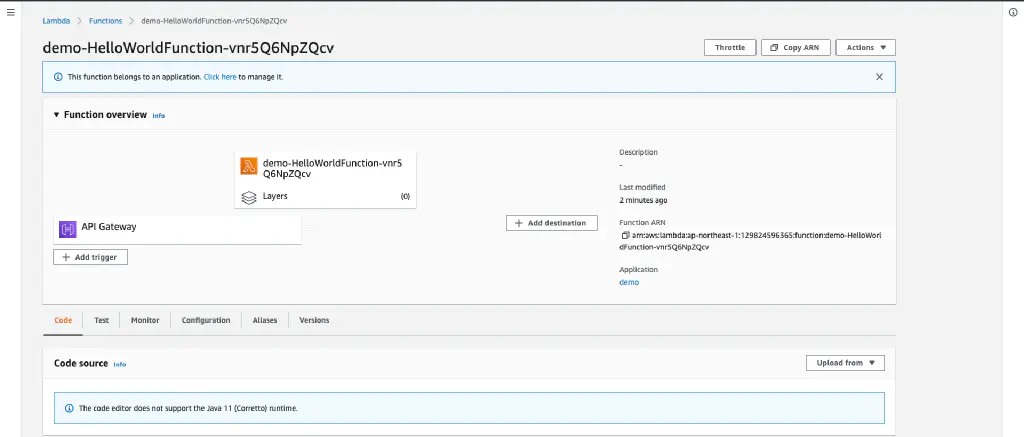
也可以在 Lambda 看到 HelloWorld Lambda Function 建立好了
 1$ curl -v https://rla530b9o1.execute-api.ap-northeast-1.amazonaws.com/Prod/hello/
 2 * Trying 13.35.7.43...
 3 * TCP_NODELAY set
 4 * Connected to rla530b9o1.execute-api.ap-northeast-1.amazonaws.com (13.35.7.43) port 443 (#0)
 5 * ALPN, offering h2
 6 * ALPN, offering http/1.1
 7 * successfully set certificate verify locations:
 8 *   CAfile: /etc/ssl/cert.pem
 9   CApath: none
10 * TLSv1.2 (OUT), TLS handshake, Client hello (1):
11 * TLSv1.2 (IN), TLS handshake, Server hello (2):
12 * TLSv1.2 (IN), TLS handshake, Certificate (11):
13 * TLSv1.2 (IN), TLS handshake, Server key exchange (12):
14 * TLSv1.2 (IN), TLS handshake, Server finished (14):
15 * TLSv1.2 (OUT), TLS handshake, Client key exchange (16):
16 * TLSv1.2 (OUT), TLS change cipher, Change cipher spec (1):
17 * TLSv1.2 (OUT), TLS handshake, Finished (20):
18 * TLSv1.2 (IN), TLS change cipher, Change cipher spec (1):
19 * TLSv1.2 (IN), TLS handshake, Finished (20):
20 * SSL connection using TLSv1.2 / ECDHE-RSA-AES128-GCM-SHA256
21 * ALPN, server accepted to use h2
22 * Server certificate:
23 *  subject: CN=*.execute-api.ap-northeast-1.amazonaws.com
24 *  start date: May 17 00:00:00 2021 GMT
25 *  expire date: Jun 15 23:59:59 2022 GMT
26 *  subjectAltName: host "rla530b9o1.execute-api.ap-northeast-1.amazonaws.com" matched cert's "*.execute-api.ap-northeast-1.amazonaws.com"
27 *  issuer: C=US; O=Amazon; OU=Server CA 1B; CN=Amazon
28 *  SSL certificate verify ok.
29 * Using HTTP2, server supports multi-use
30 * Connection state changed (HTTP/2 confirmed)
31 * Copying HTTP/2 data in stream buffer to connection buffer after upgrade: len=0
32 * Using Stream ID: 1 (easy handle 0x7f9298809200)
33 > GET /Prod/hello/ HTTP/2
34 > Host: rla530b9o1.execute-api.ap-northeast-1.amazonaws.com
35 > User-Agent: curl/7.64.1
36 > Accept: */*
37 >
38 * Connection state changed (MAX_CONCURRENT_STREAMS == 128)!
39
40
41 < HTTP/2 200
42 < content-type: application/json
43 < content-length: 58
44 < date: Sat, 03 Jul 2021 14:28:53 GMT
45 < x-amzn-requestid: fa2fb89a-5379-4167-b13c-0a59269f71e0
46 < x-amz-apigw-id: B5cU7GWTNjMFc6A=
47 < x-custom-header: application/json
48 < x-amzn-trace-id: Root=1-60e0741f-7e93aac373f51300700bbc59;Sampled=0
49 < x-cache: Miss from cloudfront
50 < via: 1.1 260a465bf4779e35dde8adbb89981df1.cloudfront.net (CloudFront)
51 < x-amz-cf-pop: TPE52-C1
52 < x-amz-cf-id: aGy5WF0naNegGjNJM1kaZpBnl5SDcg23eZMy8wYUrd0sxyQnHLnhgg==
53 <
54 * Connection #0 to host rla530b9o1.execute-api.ap-northeast-1.amazonaws.com left intact
55 { "message": "hello world", "location": "13.231.109.123" }* Closing connection 0
清理 Sam 建立好的 AWS 環境
如果大家有 Deploy 到 AWS 上,最後記得要把 CloudFormation 建立出來的環境給刪除,以免產生額外的費用。這邊可以直接到 AWS CloudFormation 把 Stack 給刪除,或者使用 AWS CLI
1$ aws cloudformation delete-stack --stack-name demo
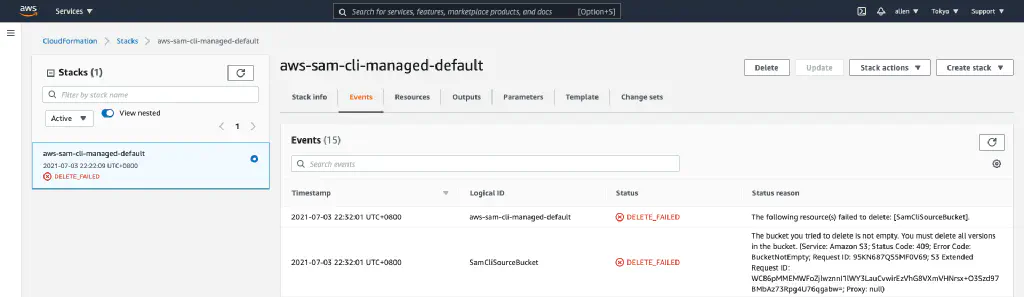
這邊要注意一下, SAM 會建立一個 S3 當作 Artifact ,所以需要先把 S3 裡面的資料手動清掉才可以 delete stack,否則 stack 會刪除失敗。以下是S3 沒有清空時的範例圖


評論